A Definitive Guide to React Architecture Patterns
When compared to other JavaScript frameworks, ReactJS is the best option for creating highly adaptable user interfaces. Since its introduction in 2013, it has revolutionized front-end development with its superb component-based design and rendering features. However, as the program evolves and more complexity is introduced, it is critical to use the right React architecture patterns and adhere to best practices to make it manageable and expandable.
With the expertise of our talented ReactJs developers, you’ll find this article about best practices for creating outstanding user interfaces very useful. The practices mentioned here in this post ensure easy maintenance and modification, and extend as your web apps evolve.
1. What is React Architecture?
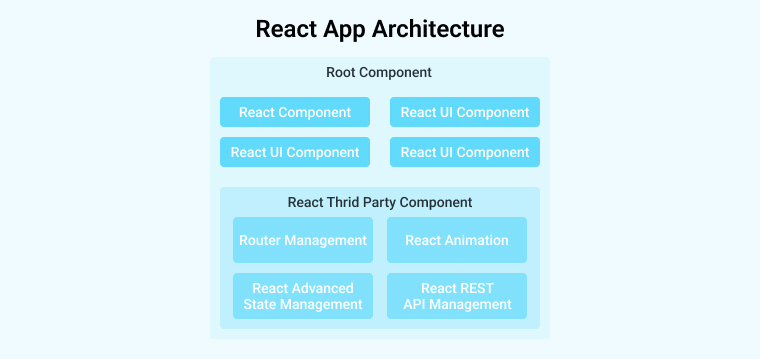
The React architecture is a set of building blocks for developing the user interface of a program. You may also look at it as a way to structure your codebase in order to create something truly original.

Buttons, forms, API services, Central React State Management services, etc. are just some of the UI elements that could be found in a React architecture. The popularity of ReactJs as a JavaScript toolkit for designing user-facing software can be attributed to its inherent versatility in design.
2. Role of React Architecture in Web Development
The term “React architecture” is used to describe the method by which a web application built with the React JavaScript framework is structured and organized. It’s similar to having a set of plans from which to work. Labels, buttons, profiles, and forms are all examples of reusable custom components that may be broken down here and reused elsewhere in the code. These parts have the capacity to store information in what is called a “state,” which is where the web app’s most vital information is kept.
What makes ReactJS stand out, however, is that it gives you complete freedom to arrange and build your code according to your unique UI requirements. It’s component-based, so as your program evolves, you can quickly add new features, improve it, and add to it.
The many advantages of the React design make it a favorite among web developers. For example:
- The modular design reduces the burden of upkeep and promotes code reusability.
- Using frameworks like Redux, global state management enables effective data management throughout every element.
- Allows for simple code growth and agility as projects expand.
- Due to its modular design, unit testing is a breeze.
3. React Architecture Patterns and Best Practices
3.1 Organizing a Directory Layout
Maintain a default state in your React app at all times. Assets, elements, services, reusable utility functions, documents, etc. are just some of the folders that make up this foundation. There are a wide variety of files within all of these directories.
When you use the create-react-app command-line tool to start a new React app, for instance, you’ll have access to a /src directory. This folder contains the index.js file, which serves as the application’s entry point in the typical installation of React. The /src directory is often used as a standard convention. This is the root directory where you’ll build all your subfolders for things like pages, components, etc.
According to this pattern, the directory structure at the highest level, where the codebase of your React application resides, may be interpreted as:
└── /src
├── /assets
├── /components
├── /context
├── /hooks
├── /pages
├── /services
├── /utils
└── App.js
├── index.js
It’s more necessary to maintain a clean structure that’s easy to grasp by everyone in the codebase than to make the directory title an impermeable guideline. Therefore, the /services directory may also be referred to as /api, based on your preferences.
3.2 Creating Common Modules
With React, you may organize your code as you choose. Yet, one of the most recommended React Architecture Patterns is to build your code around reusable common modules. Reusable components, customized React hooks, utility features, and even logic may all be packaged into separate modules. Keeping your codes in order and ready for reuse from the start may greatly simplify the development process. Sharing these modules throughout your software’s components, views, and projects makes it much simpler to implement changes to your React application.
3.3 Incorporate Custom Components in Folders
A bespoke input element written in React is demonstrated here. Create a novel directory titled “Input” under the components directory. Now, make the following files inside this input folder:
└── /src
├── /components
| ├── /Input
| | ├── Input.js
| | ├── Input.css
| | ├── Input.test.js
- Its logic is written in a JavaScript file called input.js.
- The styling for this Input element can be found in the Input.css file.
- The component’s whole suite of tests can be found in the input.test.js file.
In order to combine the components, you must first make an index.js file in the components directory. Take a look at the instance of code below:
// /src/components/index.js import { TextField } from './TextField /TextField ; import { RadioButton } from './RadioButton /RadioButton ; import { CheckBox } from './CheckBox /CheckBox ; export { TextField , RadioButton , CheckBox }; |
Once this file is prepared, it can be used across all views and pages in your project.
3.4 Create Custom Hooks
A Custom React Hook that can be reused is the equivalent of an additional component. Making a custom hook is similar to making a custom component in that it might assist in simplifying the code.
Imagine a scenario. You’ve separated the login and registration processes into separate pages in your React app. Text input areas for the user’s login info and a link to submit the form are featured on each of these web pages. The password entry box is similar across the two formats. A user can choose whether or not to display the password field by tapping the corresponding icon. Let’s assume you’re going to use the same piece of code for both the login and signup processes. If you do that, you’ll essentially be making a copy of the code.
Fortunately, this issue can be remedied by developing a specialized hook to control the display of the symbol and the field independently of one another. An example of a tailor-made hook is as follows:
// /src/hooks/useToggleFieldVisibility/index.js export const useToggleFieldVisibility= () => { const [visibility, setVisibility] = useState(true); const [icon, setIcon] = useState('mask'); const handleFieldVisibility = () => { if (icon === 'mask') { setIcon('unmask'); } else { setIcon('mask'); } setVisibility(!visibility); }; return { visibility, icon, handleFieldVisibility }; }; |
The aforementioned custom hook initiates with the naming syntax of “use.” Although React isn’t very particular about naming, it’s still best practice to adhere to them here. In addition to being reusable on a password field in the login or registration form, this hook also manages its own state and procedure.
When a reusable hook is located in a subdirectory of the /hooks directory, the structure might resemble that of components.
└── /src
├── /hooks
| ├── /useToggleFieldVisibility
| | ├── index.js
| | ├── useToggleFieldVisibility.test.js
| ├──index.js
3.5 Utilize Absolute Imports
When working with a React project that has several folders inside of other folders utilizing relative URLs like “../../components,” importing can turn into a nightmare. In contrast, you may utilize absolute routes to simplify matters. Modifying the ‘jsconfig.json’ file, a configuration file used by the code editor to interpret JavaScript, will do this.
Check out this setup example to learn how to optimize your import paths:
{ "compilerOptions": { "baseUrl": "src" }, "include": ["src"] } |
With this adjustment in place, you can use an import statement to quickly access the components stored in the ‘/src/components’ folder.
import { TextField } from ‘components’;
If your project’s root directory contains a ‘webpack.config.js,’ you may further tailor your build by adding prefixes like ‘@components’ or ‘components. Creating an alias for a folder allows you to refer to it by a different name. Check out this configuration:
module.exports = { resolve: { extensions: ['js'], alias: { '@': path.resolve(__dirname, 'src'), '@components': path.resolve(__dirname, 'src/components'), '@pages': path.resolve(__dirname, 'src/pages') } } }; |
With the following settings in place, you can quickly and simply import the necessary components with the aid of particular prefixes utilizing absolute paths:
import { TextField } from '@components'; |
3.6 Separate Business logic from UI
It is best practice to keep business logic and user interface components separate to facilitate updates and boost code quality. While the business logic can be handled independently, the UI structure should be represented by React components kept in the ‘/pages’ or ‘/views’ directory.
Let’s say you’re developing a program that will use an API to retrieve product information. To achieve this, copy the lines below into a new file named ‘api.js’ and save it in the ‘/services’ folder to keep the UI and logic separate.
import axios from 'axios'; const api = { fetchProducts: async () => { const URL = 'https://dummyjson.com/products'; return await axios.get(URL) .then((res) => res) .catch((err) => err) } } export default api; |
The preceding code will handle the application’s business logic; now we need to learn how to connect the user interface.
import './App.css' import api from './services/api' import { useState } from 'react' function App() { const [products, setProducts] = useState([]) const getProducts = () => { api .fetchProducts() .then((res) => setProducts(res.data)) } return ( <main> <div> <pre>{ JSON.stringify(products, null, 2) }</pre> <button onClick={getProducts}>Get Products</button> <button onClick={() => setProducts([])}>Clear</button> </div> </main> ); } export default App; |
This is the end product, and it demonstrates how the UI and the business logic can be kept completely separate.
3.7 Use the Utils Directory
As was previously mentioned, the Utils subdirectory provides reusable utility functions. While its presence in your app is not mandatory, it is strongly suggested for the sake of clear coding. This is an illustration of how to package a utility function.
First, copy and paste the following scripts into a new file named utils >> helper.js:
const maxUploadSize = 20; const filterProducts = (products) => { return products.filter((product) => product.price > 0); } const getTotalCost = (products) => { return products.reduce((sum,product) => sum + product.price, 0); } export { maxUploadSize, filterProducts, getTotalCost } |
You can now utilize the aforementioned scripts in your own projects by importing them.
3.8 Avoid a single Context for everything
In most cases, transferring data from a parent component to a child component is as easy as transferring the properties from the parent to the child. However, things get complicated when there are plenty of moving parts. It makes passing items difficult.
With React Context tool, you can transmit information up and down the component tree without resorting to prop drilling. It’s a different strategy that allows a parent component to prop up the complete child tree. In this method, passing unimportant props can be avoided while still facilitating data interchange.
You should use many Contexts in your React project, each dedicated to a certain purpose. Some of the UI elements in your React project, for instance, may take advantage of internationalization (also known as “i18n”) in order to better suit a global audience.
Whether or not a theme reveals a particular dark or bright mode value is irrelevant in the i18n context. In this case, you’ll have to deal with two separate context providers. It’s useful for making sensible groups of information.
const App = () => { return ( <UIProvider> <LangProvider> <Routes /> </LangProvider> </UIProvider> ) } |
Furthermore, in the event that a Context is employed within one of the components, it is unnecessary to enclose the root of the application with the source of that particular Context. If a certain component of the application does not explicitly necessitate the provision of specific data, it is not obligatory to disclose this information.
3.9 Make use of CSS in JavaScript
In React architecture, you should always use Styled Components, EmotionJS, or Linaria to implement CSS in JavaScript. It’s useful for solving stylistic and theming problems like name conflicts and the scalability of massive CSS files. When compared to alternative methods, such as CSS modules, CSS in JS is superior because it improves efficiency, makes CSS extraction simpler, and requires less build tools, such as Webpack. You can boost cooperation and efficiency by isolating styles into their own JavaScript files. As a result, we can better isolate and evaluate individual parts.
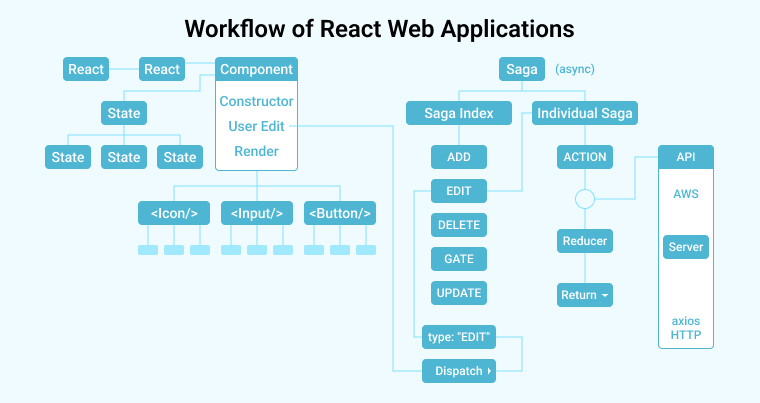
4. Workflow of React Web Applications

An example of a React architecture patterns for a big web project is shown above. The architecture relies on React libraries like Redux Saga, a piece of middleware that facilitates asynchronous communication between your store and external resources. It leverages Axios to communicate with APIs hosted on third-party servers like Amazon Web Services (AWS).
The architecture’s suitability for developing massive React apps is shown in the following examples:
Consistent Global State – The data connection between different parts of the application is facilitated by the React architecture’s Central State Management repository.
Increased Scalability – The design allows for more flexible and effective communication with back-end services.
Improved Testability – React architecture’s component-based design simplifies testing.
Decoupled Components – By decomposing a program into smaller, more modular components, one might potentially decrease the level of interdependence between these components and streamline the process of maintaining the application.
5. Conclusion
This article describes the best practices experienced by the best React developers in India. They are not guaranteed to function in all potential large-scale settings. Toss out what doesn’t apply to you and save what you think could help you manage your React project better. When structuring a React project, it’s most crucial to do it in a way that makes an explanation to you, and if you’re working in a team, it must make sense to your coworkers as well.
6. FAQs
Q.1: What advantages do React architecture patterns offer?
Ans: Advantages offered by React architecture patterns are: .
- Enhances the legibility and manageability of the code.
- Enhances overall efficiency and effectiveness.
- Scalability and agility
Q.2: What role does state management play in React architecture?
Ans: The React architecture employs the utilization of the “state” notion to govern the visual appearance and functionality of the user interface. Certain libraries, such as Redux, are designed to facilitate the management of state in software applications.
Q.3: Which architectural style is applied by React?
Ans: React provides developers with the flexibility to select and implement the most suitable architectural approach based on their own requirements.

Hardik Dhanani has a strong technical proficiency and domain expertise which comes by managing multiple development projects of clients from different demographics. Hardik helps clients gain added-advantage over compliance and technological trends. He is one of the core members of the technical analysis team.
The purpose of using a static site generator is to produce a website with static content. With React Static site generators, you may generate static...
 Jan 5, 2024


Comments
Leave a message...