A Step by Step Tutorial to Install Laravel Lumen
1. What is Laravel Lumen?
Lumen micro framework is one of the most lightweight versions of the Laravel full-stack web application framework. It is a framework that is introduced to strip the speed of the downloading process. Lumen is used for parts and tasks that can profit from the energy and ease of Laravel. However, there can be some damages in adaptability and configurability in return for speed support. Besides, when a developer is working on Lumen, updating to Laravel Development services can be easy.
Basically, Lumen is an advanced, new age, and super fast PHP micro-framework that is developed by Laravel to create microservices and Laravel APIs that enables support to complex and large Laravel web applications. Being a micro-framework, it is a faster, leaner, and smaller version of the full-stack web application framework.
In addition to this, Lumen is a micro framework that gets all its basis from Laravel and that is why developers can find many components that are similar in Lumen and Laravel.
It is effortless to update to Laravel Development services anytime while working in Lumen.
2. What is Laravel Lumen used for?
Lumen is a micro-framework that can be used for creating APIs and lighting-fast microservices that can support various types of Laravel applications. This micro framework utilizes illuminate components that the Laravel framework uses. This enables Lumen to create anything as per the user’s new project requirement. Lumen is primarily used by the development team when it comes to creating microservices that contain loosely coupled components that can enhance the improvements and reduce the complexity.
3. History – PHP Micro Framework Lumen Version
Lumen has various versions and each of them offers something that every app developer would like to work with. Let’s go through each of these versions of Lumen.
1. Lumen 5.0
This is the first version of Lumen and it came into the picture in 2015. Version 5.0 of Lumen takes its base from the 5.x series of Laravel.
2. Lumen 5.0.4
The next version of Lumen after 5.0 is 5.0.4. Whenever anyone tries to update their version to this one, he would have to change the bootstrap/app.php file. The steps to change the file is as below –
$app = new LaravelLumenApplication( realpath(__DIR__.'/../') ); |
3. Lumen 5.1.0
Lumen 5.1.0 is the version that upgrades the framework in order to use the components of Laravel 5.1. This version brought features like middleware parameters, broadcasting, and testing improvements into the market.
4. Lumen 5.2.0
Then comes Lumen 5.2.0 which upgrades the lumen framework so that it can use Laravel 5.2 components. Besides this, some of the major changes in this new update are –
- Authentication
- Only Stateless APIs
- Testing Helpers
5. Lumen 5.3.0 – 5.6.0
These are the latest versions of Lumen that offer amazing functionalities, features, and components to the developers in order to create unique microservices.
4. Laravel Installation Process
1. Installing Lumen Framework (Laravel Installation Process)
To start with, install composer and then change your directory to the root folder of the server.
D:\ cd Projects\xampp\htdocs |
Create a lumen project “lumen_api” from the “laravel/lumen” package (packagist.org).
D:\ cd Projects\xampp\htdocs composer create-project laravel/lumen lumen_api |
The composer will create a folder “lumen_api” and install all files of lumen including dependency.
Check all artisan command available in Lumen by
D:\  cd Projects\xampp\htdocs\lumen_api
php artisan |
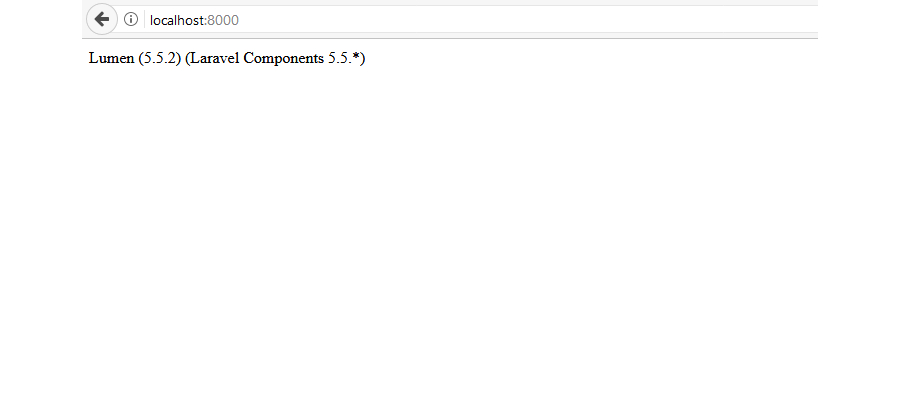
Now, you will have to run Lumen on the local server and open localhost:8000 in your web browser.
D:\ cd Projects\xampp\htdocs\lumen_api php -S localhost:8000 -t public/ |
If below screen is visible, then Lumen is successfully installed.
2. Configuration of Lumen Framework
Create a database in mysql and replace the credential “lumen_api /.env.example” file to “lumen_rest_ce/.env”
DB_CONNECTION=mysql DB_HOST=localhost DB_DATABASE=lumen_api DB_USERNAME=root DB_PASSWORD=your_password |
DB_CONNECTION=mysql DB_HOST=localhost DB_DATABASE=lumen_api DB_USERNAME=root DB_PASSWORD=your_password |
Open “lumen_api/bootstrap/app.php” and uncomment following snippet
Dotenv::load(__DIR__.'/../'); $app->withFacades(); $app->withEloquent(); |
Dotenv::load(__DIR__.'/../'); $app->withFacades(); $app->withEloquent(); |
3. Migration
Create table “templates” containing total 4 columns, namely id (int & auto incremented), title ( varchar), createdby (varchar), created_at (timestamp) and updated_at (timestamp).
In terminal/command prompt write:
D:\ cd Projects\xampp\htdocs php artisan make: migration create_templates_table --create templates |
It will create a migration file under “database/migration”.
Open the file, it will be seen that “CreateTempatesTable” class has been created. This class has two method one is “up” where table schema can be written and another is “down”, where table will be dropped which will be called at the time of rollback.
Now edit this migration file like this:
use Illuminate\Database\Schema\Blueprint; use Illuminate\Database\Migrations\Migration; class CreateTemplatesTable extends Migration { public function up() { Schema::create('templates', function(Blueprint $table) { $table->increments('id'); $table->string('title'); $table->string('createdby'); $table->timestamps(); }); } public function down() { Schema::drop('templates'); } } |
use Illuminate\Database\Schema\Blueprint; use Illuminate\Database\Migrations\Migration; class CreateTemplatesTable extends Migration { public function up() { Schema::create('templates', function(Blueprint $table) { $table->increments('id'); $table->string('title'); $table->string('createdby'); $table->timestamps(); }); } public function down() { Schema::drop('templates'); } } |
To create the table in database, migrate or run migration file:
D:\  cd Projects\xampp\htdocs
php artisan migrate |
Thereby, table will be created.
4. Model
Create a Template model under “app/Template.php” and use template table instance.
namespace App; use Illuminate\Database\Eloquent\Model; class Template extends Model { protected $fillable = ['title', 'createdby']; } |
Even, create a TemplateController.php under “app/Http/Controllers”
namespace App\Http\Controllers; use App\Template; use App\Http\Controllers\Controller; use Illuminate\Http\Request; class TemplateController extends Controller{ ..... ..... } |
5. Route
Even mention some more routes and corresponding Controller method to create Lumen RESTful API.
| Method | URL | Contoller@Method | |
| GET | http://localhost:8000/api/template | TemplateController@index | All Templates |
| GET | http://localhost:8000/api/template/{id} | TemplateController@getTemplate | Fetch Template By id |
| POST | http://localhost:8000/api/template | TemplateController@createTemplate | Create a template record |
| PUT | http://localhost:8000/api/template/{id} | TemplateController@updateTemplate | Update Template By id |
| DELETE | http://localhost:8000/api/template/{id} | TemplateController@deleteTemplate | Delete Template By id |
Open “routes/web.php”, and add routes as below. It is required to run the APIs.
$router->get('/', function () use ($router) { return $router->app->version(); }); |
$router->get('api/template', ['as' => 'template', 'uses' => 'TemplateController@index']); $router->get('api/template/{id}', ['as' => 'template', 'uses' => 'TemplateController@gettemplate']); $router->post('api/template', ['as' => 'template', 'uses' => 'TemplateController@createTemplate']); $router->put('api/template/{id}', ['as' => 'template', 'uses' => 'TemplateController@updateTemplate']); $router->delete('api/template/{id}', ['as' => 'template', 'uses' => 'TemplateController@deleteTemplate']); |
6. Controller
Edit TemplateController.php and according to routes implement those methods.
A demo for Modified TemplateController.php
namespace App\Http\Controllers; use App\Template; use App\Http\Controllers\Controller; use Illuminate\Http\Request; class TemplateController extends Controller{ public function index(){ $Templates = Template::all(); return response()->json($Templates); } public function getTemplate($id){ $Template = Template::find($id); return response()->json($Template); } public function createTemplate(Request $request){ $Template = Template::create($request->all()); return response()->json($Template); } public function deleteTemplate ($id){ $Template= Template::find($id); $Template->delete(); return response()->json('deleted'); } public function updateTemplate (Request $request,$id){ $Template = Template::find($id); $Template->title = $request->input('title'); $Template->author = $request->input('createdby'); $Template->save(); return response()->json($Template); } } |
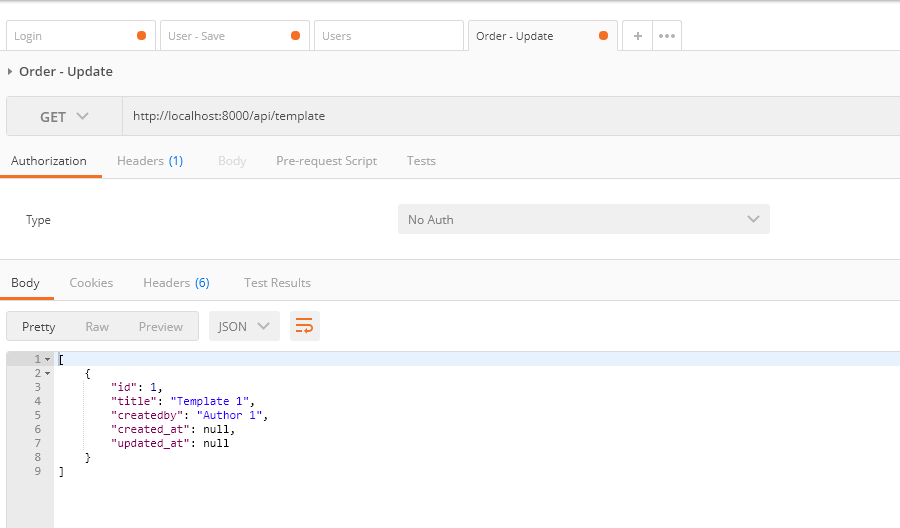
By using chrome extension POSTMAN, APIs can be tested easily. User needs to provide API URL, Method, required parameters as input, to which POSTMAN will show API response as output.
7. Testing
5. Key Features of Laravel Web Application Framework: Lumen
Some of the top features that Laravel Lumen offers for web applications are –
- Caching
- Authorization
- Authentications
- Encryption
- Errors
- Events
6. Wrapping Up
As seen in this blog, Lumen is considered under Laravel Development services. And its goal is to strip the down-speed of the website. This can neither interrupt sessions and views nor other conveniences. Basically, Lumen is optimized to create Stunningly fast microservices. After going through this pose and learning about Lumen, which full-stack structure to choose from Laravel or Lumen is completely up to the developers and the development necessities.
The tech industry has an insatiable appetite for the ability to look beyond what one could ever imagine. As these technologies continue to escalate, the...
 Jan 9, 2018

Comments
Leave a message...